
Hi, this is Berea. Brian usually does the posting, but perhaps others of us will become more active. I am going to show you the shitake mushroom logs that we inoculated at the end of March.
Shitakes are one of those food items that are delicious to eat, expensive to buy, and simple to produce yourself. Take simple with a grain of salt, because I tried once before and failed completely. I inoculated during a drought year, 2005, and didn't soak my logs because I had heard it wasn't necessary. Well, now I'm pretty sure it's necessary, if the rains aren't coming your way. But I'm getting ahead of myself.
I first experienced fresh shitake eating at Sequatchie Valley Institute, in Tennessee. This is the place that all of us at Camp Pleasant have in common - I lived there a couple of summers before Adam, Brian, Melissa, and Sean all met there. It is a homestead that educates people about sustainable living systems. They had about 75 shitake logs leaned under some oak trees, next to a creek. In the mornings I would wander down to the shitake forest, cut some fresh shrooms off the logs, and saute up my breakfast with some eggs and greens. It was high class vegetarian eating. I also participated in a shitake log workshop there and inoculated my first logs. I vowed to have them in my life again. They appeal to me because they are low maintenance, last for years, and provide an intermittent supply of food - making them a good fit for a permaculture system.
Fast forward to Camp Pleasant. Although I hadn't planned on inoculating logs this spring.....It occurred to me one morning that our neighbor and friend, Mike Larimore, had some woods that might yield a couple of small white oak trees, which is a recommended type. It is also recommended to cut the trees before the leaves come out, so in early March the timing was right. For the exchange of 1/4 of our finished mushroom logs, Mike agreed. He and Sean went to his hill farm and hauled back two small white oaks, cut into 4 ft. lengths. Healthy trees are best because they will not already be colonized with other fungus, and it will take them longer to rot. Thinning out a young forest so that established trees can grow larger is a good reason to use some trees for mushroom logs.
Meanwhile, I ordered the mushroom spore and the needed implements from The Mushroom People. This is a small mushroom spore business located at The Farm, in Tennessee. Go to www.mushroompeople.com to check them out. Previously I had used "plug" spore, which are small cylinders of wood impregnated with the spore, that you tap into drilled out holes in the logs with a hammer. This time around I went with a method my neighbors Tim and Trina had been using, "sawdust" spore, which is inserted into the logs with a specialized plunger. It is supposed to be faster and cheaper than the plugs (marginally, I think). From the mushroom people I ordered 1 kg of strain MP510 spawn, which is a wide ranging variety that fruits within 6-9 months of inoculation and within a range of 55-80 degrees F. I also ordered two drill bit stoppers, and two pounds of cheese wax. These will be explained shortly.
The Mushroom People recommend inoculating the logs within three weeks of them being cut. After two weeks, on a drizzly late March Sunday, Brian, Melissa, and I set up two work stations and began. One was outside where we could drill the logs and scatter sawdust. The other was in the house close to the stove, to keep the cheese wax consistently melted. The process for inoculating goes like this: your logs should be cut to around four foot lengths, in diameters of 3-6 inches. This is so that you can easily the handle the logs as you move them around. Holes are drilled in the log to insert the spawn. For sawdust spawn, we used a 7/16 drill bit and set the depth of the bit to 1/2 inch, using the bit stopper. This is so you can move quickly and don't have to keep checking the depth of your holes. We drilled the holes beginning 3 inches down on the log, every six inches in a straight row until the end of the log. Then we moved over 2.5 inches and drilled another row of holes every 6 inches, staggering the holes so they were centered in between the holes of the first row. This gives the spawn maximum distance from the other holes. (Note: these specifics are all according to the directions given to us by The Mushroom People, and can be found easily on their website). When holes were drilled all around the log, it was ready to be inoculated.
In the kitchen, Brian and Melissa had tunes playing and were deeply concentrated on the inoculation process. When I brought them a log, first they would take the bucket of broken-up spore clumps and stab the plunger tool into it, so that it was packed in. We borrowed the plunger tool from our friends - thanks Tim and Trina! Then the plunger was lined up over a hole and compressed. If there was more spore than hole, we brushed it away so the spore was flush with the log. Then a dab of melted cheese wax was spread over the hole, to seal in the spore and seal out other fungi that might think it was a fine place to enter the log. The wax was kept in two double boiler pots that were always switched out so one could be re-melting.
While B and M inoculated, I went down to the spot we had selected for the logs to live and set up a water catchment system to soak them in. Our spot is in between a small storage shed and a steep cedar covered hillside. Evergreens are good to keep logs under because they will be constantly shaded. Melissa had seen mushrooms growing here before so we figured it was a friendly place for them. First I cleaned out the gutter on the roof; it was full of wet half-rotted leaves, which made a nice addition to the compost pile. Then I reconfigured the downspout to drain into a long steel watering trough, about 6 ft. long and 3 ft. deep. My plan for soaking the logs was to only have to carry them about six steps each way. This is important when handling heavy, wet logs.
Here is the finished result of our day's labor: 20 shitake logs, a shady place to keep them, and water tub to soak them. It has been two weeks and I have already soaked the second stack. The directions suggested soaking the logs every two weeks during the inoculation period, when the mycelium are taking over the log. This can last up to 9 months so I want soaking the logs to be as easy as possible. I'm already scheming about a larger catchment tank that will feed into the metal tub only when I'm ready to soak.....This way fresh water is always available for the soaking. The "used" soaking water is going on plants in the garden, so it has many uses before being returned to the water cycle.

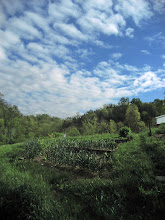
This is the path through our Chickway garden. The shitakes are tucked between the shed and the hill at the bottom.

Here the logs are stacked log cabin style, to keep them off the ground and away from other fungi during the inoculation period


Close up of the log spot and water tank.
Soaking happily.
I did finally haul off those old shitake logs from behind the cottage. Why do you suppose that it didn't work there? This post made me hungry for some mushrooms. After you set them out, do you just leave them, or are there more steps?
ReplyDelete